this is a page for
Category: Quilt Market
Hello quilting friends!
I’ve slowly been trying to get back into the swing of sharing more completed projects. As I mentioned in my last post, I had my sixth baby during the pandemic. While he is just the sweetest and easiest little guy, I really had to let a few things go to focus on my teens all the way down to my little ones.
Isn’t he a doll? He’s 17 months now.
I never stopped sewing or quilting though – I just haven’t taken the extra time to photograph and share my finished projects and I am hoping to be better about showing my current projects as well as some past finished quilts.
As I’ve mentioned a few times on the blog, a new baby girl is scheduled to arrive in our home in around 7 weeks. All three of our girls have shared a large bedroom, but now our tweens will be getting their own room downstairs, and the little girls will share a nursery.
A bit of backstory: I’ve attended Quilt Market the last two Octobers. Last October, I was honored to make a sample Molly maxi dress for the Painted Garden booth. Here it is modeled by big sister in our local greenhouse. This is still one of her favorite dresses and mine! I can’t get enough of that bright floral on turquoise.
I was lucky enough to bring home an entire fat quarter bundle of the line and added it to my stash after Quilt Market. I wanted to save it for when the yardage would release since I knew I would make a special quilt with the beautiful prints and color story. When Moda Painted Garden designer Crystal Manning shared her cute framed fabric idea on IG stories, I got the idea to use Painted Garden as the design inspiration for the girls’ new nursery. One of our base pieces of furniture is a bright green vintage dresser so it is a perfect fit for an airy and bright room with pops of color!
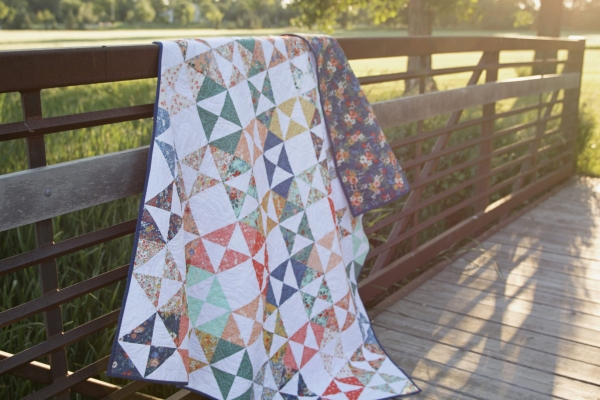
Without further ado, here is my completed baby/lap quilt. I used the Patterns by Jen Broken Panes pattern available here in paper and here as a digital pattern. The pattern is very beginner friendly. I had to do a simple cutting and strip piecing modification to accommodate using fat quarters instead of WOF yardage.
I keep a whole bolt of Moda PFD Bella Solid in my sewing room for projects and use that as my background. I was able to order yardage for my borders and binding from Missouri Star Quilt Co. and get the backing at my local quilt shop.
I did my first all-machine binding on my quilt since I hope it will get lots of use and wanted it to be sturdy in the wash. I also hadn’t revisited machine binding since I upgraded to a Babylock Soprano.
The completed quilt measures a generous 57″ x 57″ – which is the baby/lap size per the pattern. As I mentioned earlier, the pattern is written for WOF yardage. To keep the same look as the original pattern, I just used similarly colored fat quarters to achieve the same “Broken Pane” look throughout. As I quilt more, I feel more confidence in making artistic decisions and it sure is rewarding to see my idea come to life!
Because I’m nearing the end of a challenging pregnancy, and I have a few other projects I would like to finish before baby is here, I decided to have my quilt longarmed at my LQS. They always do a fabulous job, and I just wanted to make sure it was perfect to shine in baby girl’s room for several years. We chose a daisy pantograph with little pops of butterflies throughout.
I hope you enjoyed looking at my quilt today as much as I enjoyed making it!
If you love Painted Garden as much as I do, I’ve noticed that a lot of the yardage is selling very quickly and out of stock in several prints at some of my usual online quilt shopping haunts so you might have to hunt a bit! Several etsy sellers have bundles and yardage in stock and if you’re like me and desire near-instant gratification you can always Amazon prime a fat quarter bundle! Of course, check your local quilt shop! I was thrilled that mine carried a good chunk of the collection so I have made sure to pick up enough backing and border fabric for my second planned Painted Garden quilt.
Happy day, everyone! I am so excited for it to be my stop on The Tallinn Fabrics Blog Tour hosted by Art Gallery Fabrics designer Jessica Swift! I’ve been so lucky that I’ve had the privilege of working with some of the gorgeous Tallinn fabrics since Quilt Market prep last fall. If you check out some of my past posts on Instagram you can see a few of the four garments I made for Jessica’s debut booth.
When Jessica invited me to be a part of her blog tour, I knew I wanted to make a quilt for my big girls. We are preparing to move our older daughters into their own room downstairs this summer, and quilts are a beautiful way to infuse a bedroom with whimsical color. One of my daughters’ favorite activities to do after school is to curl up under a blanket and listen to audiobooks. I love watching them transported to faraway lands through literature and adventure.
For me, having the opportunity to work with the gorgeous prints of Tallinn reminded me of my own trip to Eastern Europe when I was a teenager. To be honest, I don’t remember a lot of the specifics of the trip (in fact I borrowed the above picture from my mom since I couldn’t find my own album)! I remember a whirlwind of color and new experiences. I remember the feeling of unusual adventure. The colors and motifs of Tallinn fabrics brought up many fond memories that I hope to pass down to my own children as they grow.
For the quilt pattern, I chose to use a pattern I found at my LQS: The Villa Rose Designs Movie Star Quilt. It featured enough prints that I was able to use all the prints in the Fairytale colorway. I also used some of the cool Pure Elements turquoise colors I picked up in a bundle at quilt market. I decided to be adventurous and use AGF Pure Elements Smooth Pebble for a rich background so the bold prints of Tallinn would shine. My quilt top finished at 53″ x 68″.
The entire pattern went together quickly and was made with HSTs. I spent probably as much time deciding on color and print placement as I did on piecing the quilt top. I wanted to balance the large scales, the lights and darks, and also play with the direction of two of my favorite prints: Tigris Lollipop and Baltic Swans Sand. I was assisted in making sure I cut my HSTs the correct way by rewatching the Art Gallery Fabric Quilt Block Collection Easter Lily Quilt Block video for tips on cutting my fabrics just right!
I used the large scale print Odessa Dream as my backing for the quilt and had it quilted by a local longarmer with bamboo batting. I love just how much drape the bamboo has for a nice snuggly quilt!
One of the initial reasons I was drawn to this particular quilt pattern was the piano key border. I loved having just one more opportunity to showcase each print. I then binded the quilt in another one of my favorite prints: Lore Cobblestone.
I hope you enjoyed stopping by my corner of the web today. Make sure you visit again soon as I share some more Tallinn projects with you.
Make sure you follow along and visit the other makers on the Tallinn Fabrics Blog Tour!
Thursday April 19 – Mathew Boudreaux | Mister Domestic (Puffer Vest Outfit)
Friday April 20 – Katie Skoog | The Simple Life Company (Girl’s dress, Girl’s romper)
Monday April 23 – Sharon Holland (Kantha-style Duffel Bag)
Tuesday April 24 – Eleri | Sew and Tell Project
Wednesday April 25 – Paola Baker | Love of Fabrics
Thursday April 26 –
Maureen Cracknell
Hello, dear readers! Thank you for joining me on my stop on the book tour celebrating “Utility-Style Quilts for Everyday Living” by Sharon Holland. It is an honor to be included in this line-up of makers with quilting experience ranging from beginner (like yours truly!) to the very experienced such as Cindy Wiens who shared her quilt yesterday at Live a Colorful Life. You can see the entire line-up of bloggers in Sharon’s kick-off post or visit the schedule I include at the bottom of the page. Hint: Read all the way to the end to find out how to WIN your OWN COPY!
I have been looking forward to publishing this post since I met Sharon Holland in person at Quilt Market and I received a copy of her beautiful debut quilt book: “Utility-Style Quilts for Everyday Living.” You can also purchase the SIGNED book from Sharon’s blog right here. My own signed copy means a lot to me since Sharon has been instrumental over this past year in inspiring my own passion to quilt. If you want to start piecing your own utility-style quilt today, Sharon has a free pattern available for you! You can download Roman Stripe, a perfect pattern for 2.5″ strips.
When I met Sharon in Houston she invited me to be on this tour. I tried to play it cool but I’m pretty sure I just gushed out a, “Yes, I worship you” or something like that. I spent much of my two flights home reading the tips and tricks for quilting and perusing the patterns. I also had a suitcase FULL of fabric in the overhead bin that I was eager to cut into.
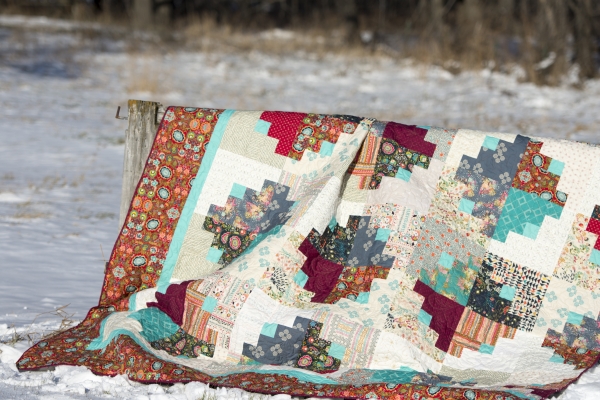
After a few days’ deliberation, I decided that the “Night & Day” pattern was perfect for the Art Gallery fabrics I desired to use. The pattern is written to finish the quilt at 87″ x 87″ and even though I am a beginner I decided I wanted a special quilt for my husband and I to enjoy in our master bedroom.
Sharon encourages makers to reach into their stashes and “experiment with color, print, and block orientation, and embrace the quirkiness that comes from working with scrap and stash materials.” I carried this thought in my creative heart through my entire planning, cutting, piecing, and final layout of my quilt.
Because my extended interest in quilting has only come about in the past 18 months, I actually do not have a very deep quilting cotton stash. I decided nearly immediately that my quilt top would be made entirely from Art Gallery Fabrics both from my scrap bin and from the four half-yard bundles I picked up in Houston.
I chose to feature Indie Folk Fabrics by Pat Bravo Design as the main collection for my quilt. I had picked up half-yard cuts of the entire collection at Quilt Market. Since “Night & Day” requires a decent mix of light and dark prints to create the striking layout. I pulled a few lighter prints from Soulful fabrics by Maureen Cracknell that I also purchased in half-yard bundles at Quilt Market.
One of Sharon’s helpful tips in the book is to take a black & white photo of your fabric pull to ensure enough contrast for your quilt. I initially cut just one test block to make sure I enjoyed the process of piecing this log cabin block, and to check my test block for accuracy. As a new quilter, I always do this to make sure that my blocks are accurate – I would rather catch a mistake on one block than on 49 of them! After my test block, I quickly cut my remaining yardage. Since I had 1/2 yard bundles, I did not have enough yardage of my “light” prints to complete the quilt as written. At several points throughout the book Sharon tells us to abandon the idea of perfection and reach into our stashes for beautiful, one-of-a-kind quilts. I also reached a bit into Katie’s scrap bin, too, since I was set on including this Indie Boheme print that I did not have quite enough of to complete a block!
After I completed several blocks, I laid out my blocks a few times to ruminate on which prints I should pull from my Art Gallery scraps and yardage. Ultimately, while Indie Folk is the feature of this quilt, I also used prints from Pure Elements, AGF Studio Capsules Lower Volume, AGF Studio Le Vintage Chic, Tapestry, and Indie Boheme fabrics. For some of the prints, I only had enough scrap fabric to make one block – this was a benefit and not a detriment to the quilt. Many times throughout the whole process I would catch a glimpse of one block and remember the particular dress I made for a lookbook or appreciate a memory about working with the fabric previously.
If you want to learn to quilt or enjoy a fresh take on quilting projects, you will want to add (affiliate) “Utility-Style Quilts for Everyday Living” to your bookshelf. There were a few points in the project where I had a general quilting question – I found all the information I needed within the pages of this book without being overwhelmed. Everything from color value, to properly cutting your fabric, to binding my quilt. While I did not quilt my top myself due to its size, I have applied the machine quilting tips I learned to other projects as I prepare for Christmas giving in my home.
Because the quilt finishes at 87″ x 87″ I wanted some extra width to it to serve as a coverlet on our California king bed. I wanted to celebrate the asymmetry of Sharon’s design as well as feature one of my favorite prints so I did break the rules and ordered yardage from Hawthorne Threads . I then added a modern asymmetrical border to bring my quilt to 98″ x 98.” This allowed me to back my quilt with 108″ wideback fabric.
I brought my quilt top to Quilter’s Eden to be long-armed with a modern poppy pantograph. I was able to see my quilt get set-up on the machine and learn more about that process as well! I chose wool batting for extra warmth since it can be quite chilly here in the winter. I also enjoyed working with Amy from Quilter’s Eden who showed me thread options and spacing/repeat options to get the look I wanted with my quilt.
I spent a few nights binding my quilt by hand after I got it back. I can’t even sum up the internal wow that climbed up my throat when I finally unfolded my finished quilt onto our bed. Just two years ago if you asked me if I was a quilter I would say, “No, I just sew.” I can’t believe I’ve now made a quilt large enough for our bed! 2018 will surely feature more finished projects from Utility-Style Quilts for Everyday Living for me here at Sew and Tell Project.
Thank you for coming by and taking a peek at my finished quilt. I hope you are inspired to reach into your stashes and make something that brings you as much joy as this project has brought me.
Do you feel lucky? Head on over to my Instagram feed and enter the giveaway to win your own copy of the book from Landauer Publishing! (Contest open to U.S. Residents Only).
Don’t forget to visit all the other makers on the tour! I can’t wait to see what Anjeannette shares with us tomorrow!
Monday 12/4 Heidi Staples – Fabric Mutt
Tuesday 12/5 Amy Friend – During Quiet Time
I feel that I could write a chapter on the influence of sewing and motherhood on my life. I hope I can do this topic justice in one blog post.
I’m honored to have been invited to contribute to the #EaseIntoMotherhood series hosted by Jodi, Erin, and Monserrat. Here is a collection of my thoughts as a mother who sews.
The following testimonial will include the role sewing has played in enhancing my personal life and happiness over the past ten years. It does not include the tremendous support I have received from my husband, our extended families, our faith, and our community in my parenting journey.
When I went to Quilt Market last fall, I had the pleasure of meeting Lindsey from Sew to Grow Patterns. Lindsay is a talented pattern designer and sewing instructor living in Australia. I love following her Instagram to see where she will go next.
When Art Gallery Fabrics asked me to sew up some women’s rayon looks for their Fusions lookbook, I contacted Lindsay since I immediately thought of her beautiful Bondi Top as suitable for flowy fabrics like Art Gallery’s newest substrate rayon. I used the Millefiori print designed by Pat Bravo Designs. I think this is actually the first WOVEN top I’ve made for myself on my sewing journey and it’s love!
The Sew to Grow Bondi top has a simple dolman construction with a flattering curved hem. I sewed the pattern as designed with two exceptions. I added 2″ for my height at the shorten/lengthen line. I also prefer to have a slightly longer front on my shirts so I used the back curve as a guide to lengthen and adjust the front curve of the Bondi. The back of my shirt is still longer than the front for a nice high-low look.
I used an Art Gallery Fabrics Denim for my contrast yoke. Art Gallery Denim is always an excellent coordinate for any of the beautiful AGF prints and it flows and drapes beautifully. I highly recommend the Bondi top for an experienced sewist looking to add some staple pieces to her wardrobe, or for a beginner, interested in learning new techniques: sewing a curved hem, applying bias tape along the neckline, top stitching, and adjusting your pattern to fit.
Even though I have had a very busy life this past month, I had to test the Mini Bondi. It is perfection! Whether you want to do Mommy and Me Bondis or just make a few for your darling girl, you can purchase the Mini Bondi now in PDF format. You can hop over to Lindsay’s IG for the special launch price code. The paper pattern will release in May if you would prefer. For my American readers, please note the price is in Australian dollars).
I had purchased this beautiful Art Gallery Fabric’s Sage Voile to make myself a dress. And the dress didn’t turn out the way I wanted, so I was able to get my top out of the skirt! I love the way the AGF voile drapes, but is still very forgiving to sew.
The mini Bondi includes all the same features as the women’s Bondi plus instructions for lengthening it into a shift dress with instructions to add a drawsting waist. I used the size chart to choose a size 8 for my daughter and lengthened it 2″ inches to accommodate her height. This is a very tween friendly addition to her wardrobe, and she has plans to help me make her a few more to wear this summer.
I am definitely on the hunt for more rayon and voile to make some mommy and me Bondis in the near future. What will you use to make your Bondi or Mini Bondi?
Happy sewing!
Eleri
xoxo
But maybe the reveal for me is that it’s okay to slow down a bit with my crafting. I am still sewing for my kids and myself. In fact, I have several garments in progress or completed that I can’t share yet.
I don’t talk about it much (or at all) on the blog, but my first foray into “I craft more than socially acceptable” was actually in the knitting and crocheting world.
About four years ago though, I realized I no longer really enjoyed knitting or crocheting. Most of it was due to physical discomfort – my wrists just don’t take to it like they used to. But I discovered when I went to Quilt Market last fall, that I missed having a relaxing portable craft. I even teased my friend that I was traveling with that we ought to buy a cheap sewing machine to avoid withdrawals.
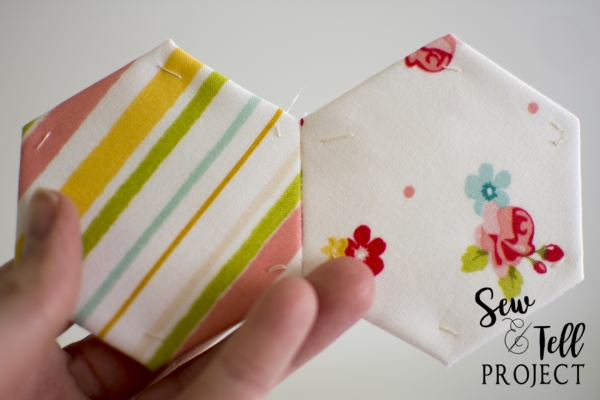
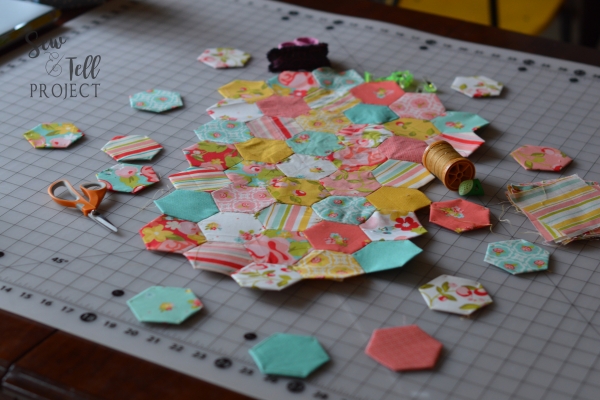
On my return flight, I watched the woman next to me English paper piece. She was creating a block from The New Hexagon by Katja Marek. As we chatted about market, and sewing, and her quilt shop, I marveled at this gorgeous block that just came from her hands with precise corners but no machine nearby. Since I was so frustrated not having a portable project to work on during market, I vowed to learn more when I got home.
I’ve been working on a hexagon quilt on and off for my daughter since November. You can read more about some of my initial thoughts and experiences with it here.
Over the past month, I’ve made a ton of progress on my quilt and it is coming together quickly now. I want to share my tips for a successful and peaceful project! This post contains some affiliate links. Many of these materials can be found at your local quilt shop, but I am sharing links for your convenience.
My last post talks about some of the resources I used to get started. I still recommend reading up on EPP before starting. It is very simple, so I will not demonstrate the technique in this post but I am happy to answer any questions. I especially liked this book by Diane Gilleland as a general resource for starting.
After my initial preparation of my EPP squares, I keep all my supplies in this double decker tote by Sterilite. A hard-sided case will ensure you don’t lose any needles.
I rarely access the bottom level of my tote. I store my growing quilt top in there, extra squares (more on that later), and the yardage I am using to complete my project. I have also been keeping a book on EPP with me for reference or to look at for inspiration. As my quilt top grows, I am finding that I am only working on adding directly to it in environments where I have enough room and where I can ensure it does not get dirty.
The top of my locking tote is what I am usually needing to access while I work. I love that I can also detach just the top level and carry it with me when I’m going out for the day and want a project to work on while waiting at an appointment or going to a friend’s house. Last Saturday, I sat in on my Weight Watcher’s meeting with just the top tote on my lap and sewed my hexies into pairs. Divine and enjoyable!
Without further ado, here is a flatlay of my all-stars for beginning to paper piece! There are a few things I tried that didn’t work out, so they do not have a spot in my EPP kit. It looks like a lot of little tools, but they all fit nicely in my case and help my work flow nicely.

I first saw the “Here Comes the Fun” Fabrics line at Quilt Market and I knew I needed to create with it. Because I had seen all the fantastic, intricate quilts at Quilt Market, I had to do the patchwork-inspired Emma’s Herringbone Dress for my oldest daughter. It was a fun way for me to utilize every print in the Cool Street colorway bundle I grabbed at Sample Spree and also try a pattern that had been on my must-make list since it released.
But the look I want to focus on for this post is the look I created for my only son! The Boy is wearing a Peek-a-Boo Pattern Shop Classic Oxford shirt. When you click around my blog, you will see LOTS of gorgeous outfits for myself and for my girls made with Art Gallery Fabrics. I want to use this stop on the blog hop to talk about how Art Gallery Fabrics work just as well for the boys!
I chose to use a fairly neutral accent print from the collection to make a simple black and white button down shirt for my four-year-old son. I added bright orange KAM snaps for a pop of color and for easy dressing and undressing for him!
One of my favorite things about this shoot, was that my little boy got to coordinate with his sisters for it. He is my third child but my oldest child has always been like a Little Mama to him. I will treasure the photos I took of them goofing around together as much as I’ve treasured my time sewing special and FUN outfits for them!
Make sure you visit the other fabulous stops on the blog tour!
Aubrey Plays
A Jennuine Life
Izzy and Ivy Designs
Holly and Company
Elle Lee and Me
Lilly Shine Boutique
Simple Life Pattern Co
SewSohpieLynn
Happiness in the Making
MADE Everyday
Little Bit Funky
Sew and Tell Project
Several weeks ago, I went to quilt market with the fabulous Katie from Simple Life Pattern Company. It was an amazing and inspiring trip! I came home with lots of ideas and inspiration to bring to my sewing room. I imagine as I add more of my Market inspired projects to the blog I will share more, but for now, I will focus on this new project.
Here is a quick snapshot of one of our fun times at Quilt Market!
A photo posted by Simple Life Pattern Company (@simplelifepatterns) on