Coco Cay Tankini + a Swim Skirt Add-on Tutorial
Today I am delighted to share with you my contribution to the Swimsuit Sewing Challenge 2016! I was hesitant at first, having never worked with swimsuit fabric, but I studied Eleri’s tips for sewing swimsuits and I’m SO glad I jumped in and gave it a try – I just found my new favorite thing to sew! Finding swimsuits that fit my daughter and suit her style is difficult – but now we can work together to create comfortable, well-fitting swimsuits that work well for her active lifestyle. No more trying to pick favorites from the catalogs, guessing at sizes, and hoping everything fits when the package arrives! Fabric shopping is much more fun, right?

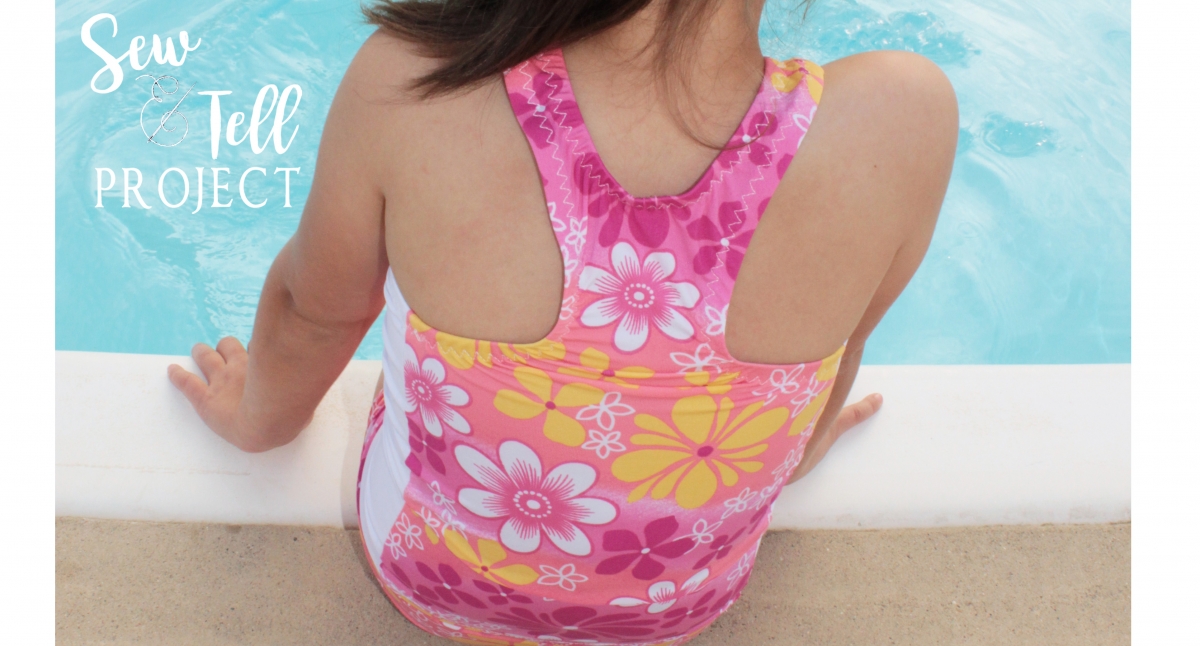
To get started, I used the Coco Cay Colorblock Tankini pattern from Peekaboo Pattern Shop. This suit is perfect for young girls – the racerback top keeps the straps in place, the boyshort bottoms offer extra coverage without riding up, and bathroom breaks are so much easier with a two piece suit. The pink and orange floral swim fabric was a red-tag special at Joann Fabrics and was perfect for this first one I made just to practice. There were no modifications aside from adding to the rise of the bottoms to assure plenty of coverage – basically an extra 1″ to the top edge all around. Even though she technically measured a 4T on the pattern, I sized up to a size 5 and the fit was perfect.

For the second version, we used these darling polka dot and mermaid swim fabrics from Peekaboo Fabric Shop . I made some slight modifications to the armscye for a perfect fit. I also added a cute skirt that is attached the boy shorts for a fun look for my athletic skirt-loving girl. She picked the mermaid fabric herself and this is by far her favorite swimsuit, although she loves the comfy fit of both of them!

On the first version, we did have an issue with some gaping around the top of the armscye near the shoulder but there is a simple fix. You can see the gaping in the picture above. To fix the gaping armscye issue near the shoulder, I angled the shoulder seams by cutting off about half an inch from the arm side of the shoulder seam and angling the cut so that the neck side of the shoulder seam stays the same. I also shortened the elastic measurement for the armscye so that it was very gently stretched all the way around. There was no gaping on round two so the modifications were a success!

Most of the swim skirts for little girls that I found have a lot more fullness and flare – similar to a circle skirt and they often just have tiny bikini bottoms attached underneath. They look adorable dry, but float up when swimming and jumping. We decided to try something different and went for more sporty look for the skirt similar to a cute athletic swim skirt that we saw at Hanna Andersson last year. (The style is no longer on their site unfortunately!) Like the Hanna Andersson ones we loved, the swimskirt I made has attached boyshorts underneath for comfort and extra coverage.
Drafting the skirt was simple. I used the boyshorts from the first swim suit I made as a general guide for the size of the finished product. I used the boyshorts pattern to get the waist edge of the skirt to match perfectly – no gathering here! The sides flair out in an a-line style, the bottom edges are curved more than the waist (love that look for this!), the back piece is longer than the front, and there is an allowance for a hem.

After sewing up the side seams of the skirt and hemming (be sure to use a stitch that can handle the stretch!), I slipped a pair of matching boyshorts that were completely finished except for the waist edge inside the skirt and basted them together at the top edge. Since I was adding a waistband, I didn’t add an extra inch to the rise of the boyshorts like I did on the first pair. After trying the skirt/shorts – still without the waistband – on my daughter, I ended up curving the front waist on both pieces down a bit more to adjust the fit better for her body. When I was happy with the fit, I used a 1.5″ wide strip of white swim fabric to make a waistband just wide enough to make a casing to accommodate my 3/8″ swim elastic. I sewed the 1.5″ strip of white swimsuit fabric into a circle and folded it in half lengthwise, sewed the swim elastic into a circle and slipped it inside the folded edge of the waistband, and then sewed the waistband to the skirt and topstitched. Although I didn’t do it on this version, it would be a good idea to secure the elastic with a large triple zigzag stitch to keep it from twisting, which it will do after being worn in the water for a while.

As you can see Swimsuit Sewing Challenge 2016 was a great success and we’re looking forward to making many, many more swimsuits. My little girl LOVES her perfectly-fitting, mommy-made swimsuits and tells everyone she sees that her mommy made them for her. A positive reception like that make sewing for her even more rewarding! I think that this cute flamingo print would be gorgeous colorblocked with this black and white chevron for her next Coco Cay Colorblock Tankini, don’t you?
Don’t forget to pin for later! Happy Sewing!


Related Posts

Ramona Quilt Featuring Lady Bird Fabrics!
Hello quilting friends!
I’ve slowly been trying to get back into the swing…
Blessed Carlo Acutis Book Review
Hello, friends! I know it’s been a bit since I’ve shown…
Felicia Balezentes | 12th Jul 16
Very cute! I have this pattern but haven’t made it yet. I love the skirt add-on!
MadeByEmily | 12th Jul 16
Thanks! I LOVE this pattern and am already planning on sewing more.
Juliann Whicker | 12th Jul 16
Oh my! This is so fun! I’m so glad you went for it. Absolutely adorable.
MadeByEmily | 12th Jul 16
Thanks so much!! You helped inspire me!
Cassy Gobin | 12th Jul 16
I’m so impressed with anyone who makes swimwear! These look great! Way to go.
MadeByEmily | 12th Jul 16
Thanks so much!!