this is a page for
Category: Craft
Hello fabric friends!
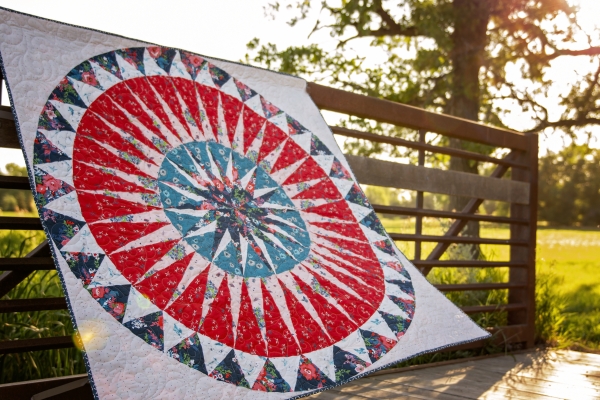
I am thrilled to be included in another one of Sharon Holland’s fabulous blog tours. I promise you that you are in for a textile treat if you stop and visit the other makers. I love the fabulous banner tutorial Dritz shared with us last Friday, and I’m happy to be the first maker on the tour this week.
Make sure you visit Sharon Holland on Instagram as she is hosting very cool weekly giveaways featuring the tour’s sponsors: Dritz Sewing, BlocLoc Rulers, and Fat Quarter Shop. She is also hosting a similar giveaway on the weekly recap blog post. Continue Reading
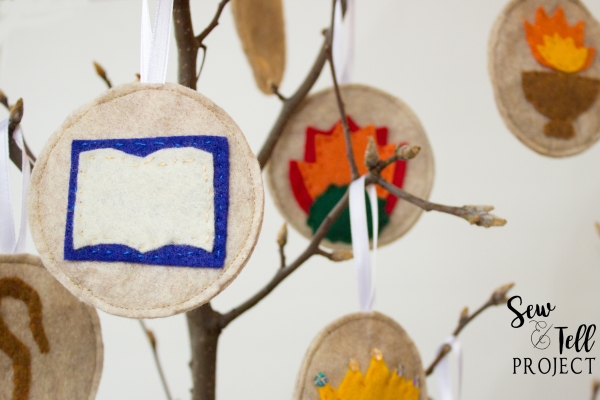
The Book of Isaiah predicts the coming of a Messiah from the line of Jesse, father of King David. “But a shoot shall sprout from the stump* of Jesse, and from his roots a bud shall blossom (Isaiah 11:1). From this comes the concept of the Jesse Tree – a tree on which hangs a collection of symbolic ornaments that represent various chronological stories in Salvation History from Creation to the coming of the Savior. For example, the coat of many colors represents the story of Joseph, the ladder is for Jacob, and the basket in the water is for the story of baby Moses. Our particular set of Jesse Tree ornaments also correspond with the O Antiphons which are traditionally sung from December 17th through December 23rd. On each day in Advent, Bible verses are read and the corresponding ornament is hung on the Jesse Tree. Slowly, as Christmas approaches, the tree is filled up with ornaments and we have time each day to reflect and prepare our hearts for the coming of Christ. Continue Reading
My version is sewn (using double sided, heat sensitive interfacing to hold the layers together, and then top stitching for detail and permanence), but you could easily throw this together with a hot glue gun.
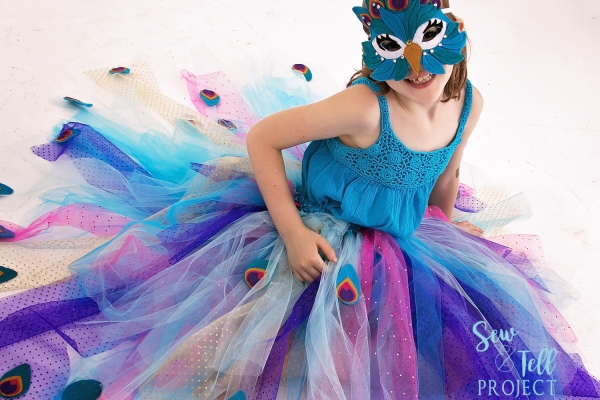
Another great feature is that it’s super inexpensive to make–I spent less than $20 on felt, tulle, interfacing, and the pre-made waistband. I added the rhinestones from craft supplies I had at home because sparkle is necessary for this little girl. I also have a set of Felt Wings cut out to match. I can’t wait to see them together! Don’t worry…I’ll share. 😉
I added an extra layer of tulle. It’s not a full layer, like the first two, just adding pieces here and there to fill in spots or add a pop of color. I used a wide selection of tulle–matte, shiny, sequined, and glittered. I love the effect all the colors and textures make together!
The mask includes sizes 2-10, and the tutu instructions will fit newborn to 12. The tutorial includes instructions to customize to any size, however…even to adult!
But did you know that PAB
recently expanded to include digital designs Continue Reading
I have sewn tons of garments. Pants, shirts, dresses, hats, swimsuits, mermaid tails….lots of variety. But I have never attempted a quiet book! When I saw the pattern sneaks of this darling doll house, I was hooked and I knew I had to sew one up for my baby boy. See how cute he is? <3
The preview images I saw were decidedly girly, and I decided right away that Baby Mac needed a Cabin in the Woods because I knew that this pattern had so many options for so much fun! I also decided to upcycle some of my husband’s old clothing as part of this book. The pattern and tutorial include pieces and instructions to make a front door, a bedroom, a living room, a swimming hole, a tent, and/or a campfire. All of them are just darling and include all kinds of fun details. I’ll warn you; while this pattern is certainly not difficult, it is very time consuming. It’s also a great scrap buster! If you cut on the bias, as suggested, you won’t have to worry as much about fraying fabrics. However, I didn’t have large enough pieces of some of the fabrics I wanted to use, so I did a lot of tight zig zag stitching on my pieces.
This cover uses a pair of old corduroy pants for the house, and the roof is made from an old button down shirt. The button that makes up the door knob is from the shirt! While these patterns come with the book, I added a bit of flare here; the bushes were free-handed, and our cabin in the woods NEEDED a Michigan State University spirit flag. 😉 I also added some of the button flowers detailed in the tutorial (they are detachable and reversible, so little hands can practice buttoning), and my hedge opens to show a little surprise.
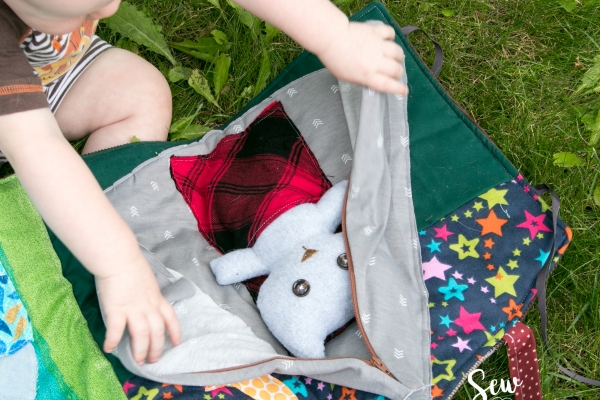
My next page is a tent. The pattern calls for a button closure at the bottom, but I decided to add a zipper for my guy to play with. I also split the background so I could use starry flannel for the sky. When you unzip the tent…
Kitty is sleeping in his sleeping bag! The pattern includes 3 dolls–kitty, bear, and mouse. I made my kitty with soft grey fleece and upcycled button eyes.
In the next page, baby can play with the fishies jumping between waves, or Kitty can take a swim in the pond. I added a sun just for an extra pop of color.
The back page of the Dolls House Quiet Book was left up to the imagination; you could make a garden of button flowers of different colors and textures. I decided to make a path into the woods. The treetops and path are freehanded, and the tree trunks are based on the piece included to make the camp fire.
I was a little unsure if my guy would like this; he’s at that age where toys are interesting for about 10 minutes before he tosses them aside to climb onto my desk and try to press all of the buttons on my sewing machines while simultaneously throwing all of my wonder clips on the floor and trying to eat my pins. 😉 But…he likes it a lot! One of his favorite activities right now is putting something in something else, and then taking it out again, so he LOVES putting Kitty in his sleeping bag and pond.
Be sure to visit the Rebecca Page PDF Pattern Group on Facebook to see all of the other darling Quiet Books, and be sure to join in the Dolls House Quiet Book Sewalong! The pattern is available at its introductory price of $5 through the end of the sewalong, August 13, 2017. After, it will be priced at $6.50.


