this is a page for
Category: madebyeleri
Hello fabric friends!
I am thrilled to be included in another one of Sharon Holland’s fabulous blog tours. I promise you that you are in for a textile treat if you stop and visit the other makers. I love the fabulous banner tutorial Dritz shared with us last Friday, and I’m happy to be the first maker on the tour this week.
Make sure you visit Sharon Holland on Instagram as she is hosting very cool weekly giveaways featuring the tour’s sponsors: Dritz Sewing, BlocLoc Rulers, and Fat Quarter Shop. She is also hosting a similar giveaway on the weekly recap blog post.
As I’ve mentioned a few times on the blog, a new baby girl is scheduled to arrive in our home in around 7 weeks. All three of our girls have shared a large bedroom, but now our tweens will be getting their own room downstairs, and the little girls will share a nursery.
A bit of backstory: I’ve attended Quilt Market the last two Octobers. Last October, I was honored to make a sample Molly maxi dress for the Painted Garden booth. Here it is modeled by big sister in our local greenhouse. This is still one of her favorite dresses and mine! I can’t get enough of that bright floral on turquoise.
I was lucky enough to bring home an entire fat quarter bundle of the line and added it to my stash after Quilt Market. I wanted to save it for when the yardage would release since I knew I would make a special quilt with the beautiful prints and color story. When Moda Painted Garden designer Crystal Manning shared her cute framed fabric idea on IG stories, I got the idea to use Painted Garden as the design inspiration for the girls’ new nursery. One of our base pieces of furniture is a bright green vintage dresser so it is a perfect fit for an airy and bright room with pops of color!
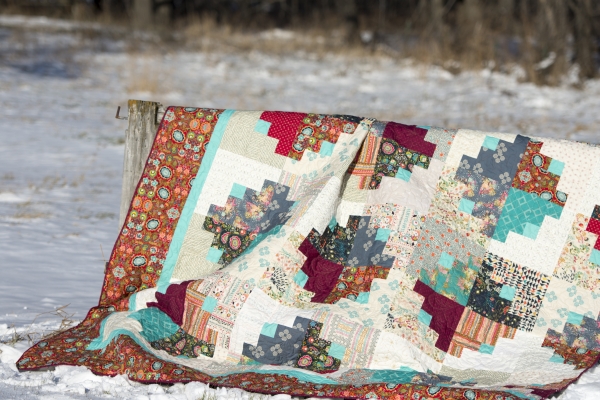
Without further ado, here is my completed baby/lap quilt. I used the Patterns by Jen Broken Panes pattern available here in paper and here as a digital pattern. The pattern is very beginner friendly. I had to do a simple cutting and strip piecing modification to accommodate using fat quarters instead of WOF yardage.
I keep a whole bolt of Moda PFD Bella Solid in my sewing room for projects and use that as my background. I was able to order yardage for my borders and binding from Missouri Star Quilt Co. and get the backing at my local quilt shop.
I did my first all-machine binding on my quilt since I hope it will get lots of use and wanted it to be sturdy in the wash. I also hadn’t revisited machine binding since I upgraded to a Babylock Soprano.
The completed quilt measures a generous 57″ x 57″ – which is the baby/lap size per the pattern. As I mentioned earlier, the pattern is written for WOF yardage. To keep the same look as the original pattern, I just used similarly colored fat quarters to achieve the same “Broken Pane” look throughout. As I quilt more, I feel more confidence in making artistic decisions and it sure is rewarding to see my idea come to life!
Because I’m nearing the end of a challenging pregnancy, and I have a few other projects I would like to finish before baby is here, I decided to have my quilt longarmed at my LQS. They always do a fabulous job, and I just wanted to make sure it was perfect to shine in baby girl’s room for several years. We chose a daisy pantograph with little pops of butterflies throughout.
I hope you enjoyed looking at my quilt today as much as I enjoyed making it!
If you love Painted Garden as much as I do, I’ve noticed that a lot of the yardage is selling very quickly and out of stock in several prints at some of my usual online quilt shopping haunts so you might have to hunt a bit! Several etsy sellers have bundles and yardage in stock and if you’re like me and desire near-instant gratification you can always Amazon prime a fat quarter bundle! Of course, check your local quilt shop! I was thrilled that mine carried a good chunk of the collection so I have made sure to pick up enough backing and border fabric for my second planned Painted Garden quilt.
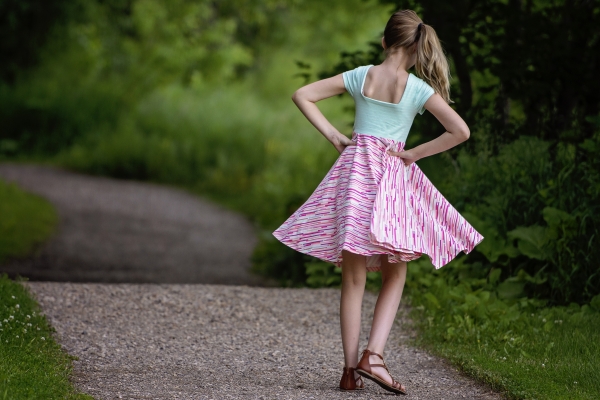
When a big box of knits arrives at my house (not very frequently if my husband is reading this), two of my daughters immediately start claiming fabrics and asking for dresses. To be honest, they have been a bit “mama-made” starved the past several months. I am nearly 30 weeks pregnant now and have taken a bit of a pregnancy and long winter-related hiatus from doing a lot of girls’ sewing, blogging, and shooting. The new Skyler dress pattern was perfect to get my “sewjo” back and also take advantage of utilizing some fabric cuts that I loved but had been sitting for several months. And if you haven’t seen the news on Instagram, I am having another girl, so I promise more girls’ sewing is coming!
I love sewing with knits, particularly high-quality cotton lycra/spandex. I made this version in one of my favorite Art Gallery Fabrics prints by Sharon Holland Designs.
I chose to do the large bow back view for this version and had just enough fabric for the circle skirt. This is a straight size 4.
One of the variations of Skyler’s top and dress includes small side bows. I made 3 sets of hairbows to coordinate with her favorite Skyler dresses as you can see in this picture. Just follow the tutorial to make the bows and hot glue to your favorite clip of choice. Due to the thickness of her hair, I used french barrettes so they would not slip out.
For my next Skyler, I combined one of my favorite fabrics, Art Gallery Yellow Stripes, with a large remnant I had leftover from sewing for the Printemps Fusions Lookbook earlier this spring. I just cut the fabric to length to the width of fold due to the limited yardage I had. Luckily, with knits you can get away with removing a few inches on gathered skirts. This pattern is also suitable for using woven fabric for the SKIRT ONLY but I prefer to make all-knit dresses for ease of washing and comfortable wear.
For this version, I chose the simple square back. The instructions were clear to make a fully-lined and unique bodice.
I also used my time during testing to get Little Miss’s 4th of July outfit created! Doesn’t she look like a little firecracker? I did another large center bow for her and used the circle skirt for maximum twirl! The fabric is a custom print I picked up last summer that is no longer available. I’m glad I saved it for the right pattern!
During testing this Little Miss also had a 4th birthday! I pulled every gorgeous floral and every whimsical print I had out of my stash to let her choose! She kept saying, “Nope. Not enough colors.” Until we arrived at this stripe which is still in stock here! Momfession: I tried one more time to get her to choose a tossed print so I could do the speedy circle skirt. But, seriously, even if you use all the options, my first Skyler took me less than 2 hours even with careful stripe matching and needing to follow the instructions step by step.
She wore this to her birthday party and got soooo many compliments!
Finally, I want to share my very favorite Skyler!
My nearly ten-year-old daughter helped me find these beautiful fabrics in my stash. I combined Art Gallery sleek mint stripes with another older AGF print from the Geometric Bliss collection. My daughter wanted a circle skirt and simple square back done on the modest cut line with short sleeves for summer events. The pattern also includes full-length sleeves so I know it will transition well for back to school. I sewed her a straight size 10 bodice and lengthened the skirt to a 12 due to her height.
The dress had the tween-friendly, retro look we were both going for. I usually avoid cutting a circle skirt on directional fabric, but since these were vertical stripes in short bursts, I thought it would be fun to play with the print’s orientation within the circle skirt. It kind of looks like a colorful disco ball to me!
Last but not least, I have a bonus Skyler to share! 3 of us 4 over at Sew and Tell Project participated in testing the Skyler. We all loved it! Here is Emily’s beautiful version in a size 7/8L on her little girl. I love the colorful use of chevrons to showcase the pattern.
I hope one or two of these beautiful dresses has inspired you to add the Skyler’s Square Back Top and Dress to your pattern stash and more importantly, get sewing! Tell us what you think below!
Happy day, everyone! I am so excited for it to be my stop on The Tallinn Fabrics Blog Tour hosted by Art Gallery Fabrics designer Jessica Swift! I’ve been so lucky that I’ve had the privilege of working with some of the gorgeous Tallinn fabrics since Quilt Market prep last fall. If you check out some of my past posts on Instagram you can see a few of the four garments I made for Jessica’s debut booth.
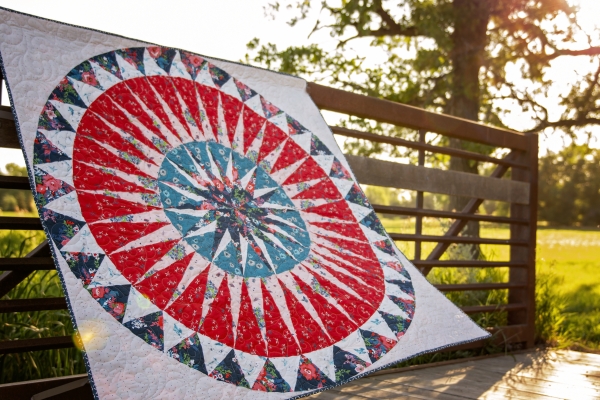
When Jessica invited me to be a part of her blog tour, I knew I wanted to make a quilt for my big girls. We are preparing to move our older daughters into their own room downstairs this summer, and quilts are a beautiful way to infuse a bedroom with whimsical color. One of my daughters’ favorite activities to do after school is to curl up under a blanket and listen to audiobooks. I love watching them transported to faraway lands through literature and adventure.
For me, having the opportunity to work with the gorgeous prints of Tallinn reminded me of my own trip to Eastern Europe when I was a teenager. To be honest, I don’t remember a lot of the specifics of the trip (in fact I borrowed the above picture from my mom since I couldn’t find my own album)! I remember a whirlwind of color and new experiences. I remember the feeling of unusual adventure. The colors and motifs of Tallinn fabrics brought up many fond memories that I hope to pass down to my own children as they grow.
For the quilt pattern, I chose to use a pattern I found at my LQS: The Villa Rose Designs Movie Star Quilt. It featured enough prints that I was able to use all the prints in the Fairytale colorway. I also used some of the cool Pure Elements turquoise colors I picked up in a bundle at quilt market. I decided to be adventurous and use AGF Pure Elements Smooth Pebble for a rich background so the bold prints of Tallinn would shine. My quilt top finished at 53″ x 68″.
The entire pattern went together quickly and was made with HSTs. I spent probably as much time deciding on color and print placement as I did on piecing the quilt top. I wanted to balance the large scales, the lights and darks, and also play with the direction of two of my favorite prints: Tigris Lollipop and Baltic Swans Sand. I was assisted in making sure I cut my HSTs the correct way by rewatching the Art Gallery Fabric Quilt Block Collection Easter Lily Quilt Block video for tips on cutting my fabrics just right!
I used the large scale print Odessa Dream as my backing for the quilt and had it quilted by a local longarmer with bamboo batting. I love just how much drape the bamboo has for a nice snuggly quilt!
One of the initial reasons I was drawn to this particular quilt pattern was the piano key border. I loved having just one more opportunity to showcase each print. I then binded the quilt in another one of my favorite prints: Lore Cobblestone.
I hope you enjoyed stopping by my corner of the web today. Make sure you visit again soon as I share some more Tallinn projects with you.
Make sure you follow along and visit the other makers on the Tallinn Fabrics Blog Tour!
Thursday April 19 – Mathew Boudreaux | Mister Domestic (Puffer Vest Outfit)
Friday April 20 – Katie Skoog | The Simple Life Company (Girl’s dress, Girl’s romper)
Monday April 23 – Sharon Holland (Kantha-style Duffel Bag)
Tuesday April 24 – Eleri | Sew and Tell Project
Wednesday April 25 – Paola Baker | Love of Fabrics
Thursday April 26 –
Maureen Cracknell
You can buy the baby Saylor here! And you can grab the girls’ Saylor here!
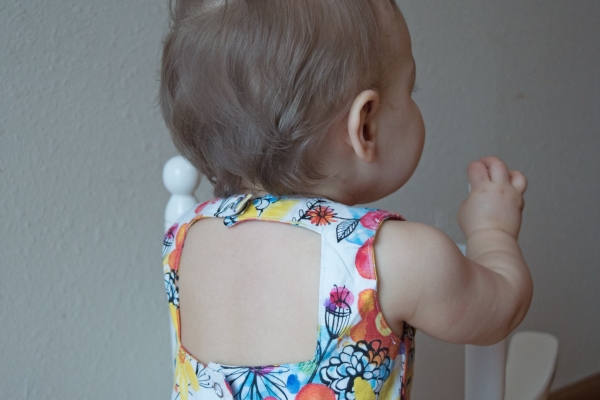
The Saylor is a versatile, sleeveless dress and top with several backview variations and optional cap sleeves. One of my favorite features is the accent bows for the dress with bonus hairbow tutorial.
Alisha and I both sewed the SAME back view! Don’t you love it when you share similar tastes with a friend? It makes helping each other choose fabric and patterns so much more fun!
I love how sweet Miss M looks with her beautiful square back and romper bottom outfit!
I think Miss M likes her outfit, too! Now, let me share what my own Miss M thinks of her Saylor dress!
My little miss has been on a serious growth spurt as we approach her 4th birthday! I made her a straight size 5, so even with the deep 2″ hem in the pattern instructions, her dress hits below the knees. I’m okay with this since it will mean it should fit most of the summer. But if she grows, Saylor is a very quick and enjoyable sew! I think many more of these will be in her closet this summer!
To make her look I used some of the gorgeous new Tallinn Fabrics collection by Jessica Swift! This gorgeous red print is Odessa Traditionale and it is one of my favorite prints from the collection. I actually just backed an entire quilt that I will share with you at the end of the month in the alternate colorway!
Once I made my first Saylor and realized how quick it was, I decided that my big girls needed their own Saylor dresses. I used one of my favorite prints from Maureen Cracknell’s Soulful collection. I realized last week when we had a fancy family dinner outing, that my big girls have grown A LOT over this winter. I made Miss E the size 10 and added 0.5″ to the bodice length and 2″ to the skirt. Saylor is designed to fall just above the knee, but with how quickly the girls are growing these days (and with snow still on the ground) I wanted to make sure this was long enough through the summer.
One of my favorite things about the Saylor is the classic silhouette. It is a wonderful beginner sew that has several details so you can make Saylor many times without making the same design twice! I can’t wait to share more Saylors with you through this summer.
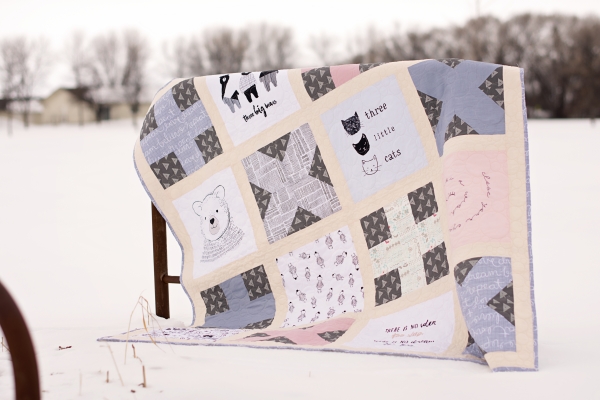
I was very excited to be invited to sew-a-long because I have been keeping a secret: I’m expecting a new baby at the end of this summer and my ability to sew has been limited. It was wonderful to start this Hideaway Quilt and finish it as I was transitioning into the second trimester.
One of the features of the Hideaway Quilt is the large blocks which make this a quick sew. The feature blocks are from Art Gallery Fabrics beautiful Capsules: Nest collection. Nest is the perfect collection for the modern nursery. The Hideaway Quilt Kit available HERE at Fat Quarter Shop utilizes Nest fabrics and coordinating AGF Pure Elements fabrics. You can also order the recommended Creative Grids ruler at the same time as the kit.
I was very glad I picked up a Creative Grids 12.5″ ruler for fussy cutting the Nest Panel set and making quicker cuts for the 12.5″ blocks. I debated adding another ruler to my collection but I was so impressed with the non-slip functionality of the Creative Grids ruler, that I also replaced my 6×24″ ruler with a 6.5″ x 24.5″ ruler from Creative Grids.
For the quiltalong, I of course featured the Nest Fabrics Panel set, and a few of the main prints from the collection. I really wanted to showcase how well all the Art Gallery Capsules collections coordinate with one another, so I pulled favorite prints from Le Vintage Chic Fabrics to mix with Prisma Elements for the contrast fabric in my blocks. You can also find a splash of the Denim Studio in my quilt blocks.
I had a hard time deciding what fabric to use for my background. Ultimately, I decided to go with PE-471 Sweet Macadamia for my quilt background. I wanted to have a warm neutral to stand out against the modern grays and whites and baby pinks and blues throughout the quilt.
I used Amy Sinibaldi’s Playground Fabrics for my quilt’s background. I actually picked this backing up during a Fat Quarter Shop 24 Hour Flash Sale. Make sure you sign up for their newsletter to get great offers!
Finally, I decided after working with such a geometric quilt, that I wanted something circular for my quilting. I tend to gravitate toward traditional quilting patterns when it is time to finish a quilt, but wanted to celebrate the modern look of the Hideaway Quilt. I had my quilt longarmed locally and she had just the right pebbles/bubbles pattern to achieve the look I wanted!
Make sure you head on over the Fat Quarter Shop blog on 3/15 to check out the other Hideaway Quilts in the quiltalong and search #hideawayquilt and #fqsquiltalong on social media for more inspiration!
Hello, dear readers! Thank you for joining me on my stop on the book tour celebrating “Utility-Style Quilts for Everyday Living” by Sharon Holland. It is an honor to be included in this line-up of makers with quilting experience ranging from beginner (like yours truly!) to the very experienced such as Cindy Wiens who shared her quilt yesterday at Live a Colorful Life. You can see the entire line-up of bloggers in Sharon’s kick-off post or visit the schedule I include at the bottom of the page. Hint: Read all the way to the end to find out how to WIN your OWN COPY!
I have been looking forward to publishing this post since I met Sharon Holland in person at Quilt Market and I received a copy of her beautiful debut quilt book: “Utility-Style Quilts for Everyday Living.” You can also purchase the SIGNED book from Sharon’s blog right here. My own signed copy means a lot to me since Sharon has been instrumental over this past year in inspiring my own passion to quilt. If you want to start piecing your own utility-style quilt today, Sharon has a free pattern available for you! You can download Roman Stripe, a perfect pattern for 2.5″ strips.
When I met Sharon in Houston she invited me to be on this tour. I tried to play it cool but I’m pretty sure I just gushed out a, “Yes, I worship you” or something like that. I spent much of my two flights home reading the tips and tricks for quilting and perusing the patterns. I also had a suitcase FULL of fabric in the overhead bin that I was eager to cut into.
After a few days’ deliberation, I decided that the “Night & Day” pattern was perfect for the Art Gallery fabrics I desired to use. The pattern is written to finish the quilt at 87″ x 87″ and even though I am a beginner I decided I wanted a special quilt for my husband and I to enjoy in our master bedroom.
Sharon encourages makers to reach into their stashes and “experiment with color, print, and block orientation, and embrace the quirkiness that comes from working with scrap and stash materials.” I carried this thought in my creative heart through my entire planning, cutting, piecing, and final layout of my quilt.
Because my extended interest in quilting has only come about in the past 18 months, I actually do not have a very deep quilting cotton stash. I decided nearly immediately that my quilt top would be made entirely from Art Gallery Fabrics both from my scrap bin and from the four half-yard bundles I picked up in Houston.
I chose to feature Indie Folk Fabrics by Pat Bravo Design as the main collection for my quilt. I had picked up half-yard cuts of the entire collection at Quilt Market. Since “Night & Day” requires a decent mix of light and dark prints to create the striking layout. I pulled a few lighter prints from Soulful fabrics by Maureen Cracknell that I also purchased in half-yard bundles at Quilt Market.
One of Sharon’s helpful tips in the book is to take a black & white photo of your fabric pull to ensure enough contrast for your quilt. I initially cut just one test block to make sure I enjoyed the process of piecing this log cabin block, and to check my test block for accuracy. As a new quilter, I always do this to make sure that my blocks are accurate – I would rather catch a mistake on one block than on 49 of them! After my test block, I quickly cut my remaining yardage. Since I had 1/2 yard bundles, I did not have enough yardage of my “light” prints to complete the quilt as written. At several points throughout the book Sharon tells us to abandon the idea of perfection and reach into our stashes for beautiful, one-of-a-kind quilts. I also reached a bit into Katie’s scrap bin, too, since I was set on including this Indie Boheme print that I did not have quite enough of to complete a block!
After I completed several blocks, I laid out my blocks a few times to ruminate on which prints I should pull from my Art Gallery scraps and yardage. Ultimately, while Indie Folk is the feature of this quilt, I also used prints from Pure Elements, AGF Studio Capsules Lower Volume, AGF Studio Le Vintage Chic, Tapestry, and Indie Boheme fabrics. For some of the prints, I only had enough scrap fabric to make one block – this was a benefit and not a detriment to the quilt. Many times throughout the whole process I would catch a glimpse of one block and remember the particular dress I made for a lookbook or appreciate a memory about working with the fabric previously.
If you want to learn to quilt or enjoy a fresh take on quilting projects, you will want to add (affiliate) “Utility-Style Quilts for Everyday Living” to your bookshelf. There were a few points in the project where I had a general quilting question – I found all the information I needed within the pages of this book without being overwhelmed. Everything from color value, to properly cutting your fabric, to binding my quilt. While I did not quilt my top myself due to its size, I have applied the machine quilting tips I learned to other projects as I prepare for Christmas giving in my home.
Because the quilt finishes at 87″ x 87″ I wanted some extra width to it to serve as a coverlet on our California king bed. I wanted to celebrate the asymmetry of Sharon’s design as well as feature one of my favorite prints so I did break the rules and ordered yardage from Hawthorne Threads . I then added a modern asymmetrical border to bring my quilt to 98″ x 98.” This allowed me to back my quilt with 108″ wideback fabric.
I brought my quilt top to Quilter’s Eden to be long-armed with a modern poppy pantograph. I was able to see my quilt get set-up on the machine and learn more about that process as well! I chose wool batting for extra warmth since it can be quite chilly here in the winter. I also enjoyed working with Amy from Quilter’s Eden who showed me thread options and spacing/repeat options to get the look I wanted with my quilt.
I spent a few nights binding my quilt by hand after I got it back. I can’t even sum up the internal wow that climbed up my throat when I finally unfolded my finished quilt onto our bed. Just two years ago if you asked me if I was a quilter I would say, “No, I just sew.” I can’t believe I’ve now made a quilt large enough for our bed! 2018 will surely feature more finished projects from Utility-Style Quilts for Everyday Living for me here at Sew and Tell Project.
Thank you for coming by and taking a peek at my finished quilt. I hope you are inspired to reach into your stashes and make something that brings you as much joy as this project has brought me.
Do you feel lucky? Head on over to my Instagram feed and enter the giveaway to win your own copy of the book from Landauer Publishing! (Contest open to U.S. Residents Only).
Don’t forget to visit all the other makers on the tour! I can’t wait to see what Anjeannette shares with us tomorrow!
Monday 12/4 Heidi Staples – Fabric Mutt
Tuesday 12/5 Amy Friend – During Quiet Time
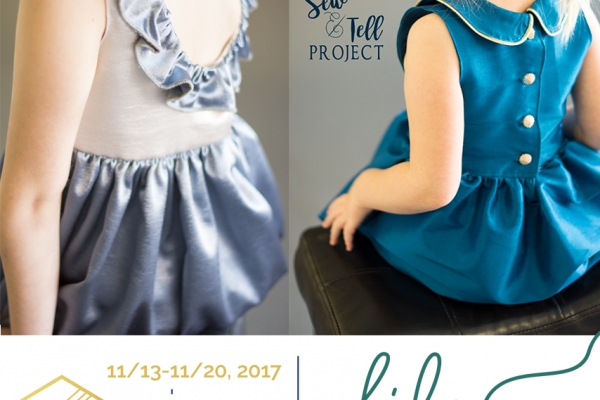
I had a lot of fun sewing for the tour and I am so grateful that Harts Fabric sponsored the first look I am sharing with you today! I used crepe-backed satin in gunmetal and oyster to make this SLPco Sophie dress for my 9-year-old daughter.
The Sophie is a fitted dress designed for woven patterns. I last made a Sophie for my daughter about 8 months ago and it was getting a little snug, so I sewed the next size up for the tour. My satin was 52″ wide so I made the skirt a little bit fuller on this Sophie since the satin has a ton of drape. Despite having this beautiful drape, it is also thick and not sheer at all. I’m a big believer in wearing a slip under dresses but there was no need for this particular look.
The satin was very easy to work with due to the crepe-backing. I did use a microtex needle to prevent any snags or runs. I definitely recommend this gorgeous satin which is also available in teal for girls’ and womens’ wear. Hart’s Fabric had such a nice selection of special occasion and apparel fabrics it was really hard to choose!
I did choose to slim out the ruffle on the collar piece. The satin layers are thicker and with more body than traditional quilting cotton, so I wanted it to look more like a ruffled flounce along her neckline. I then used my Aurifil 80 weight thread to hand tack the ruffle in several places along the neckline. The Aurifil 80 weight is so fine it just disappears into the fabric!
I made my 3 year-old-daughter a dress for Christmas, too! Even though she has hand-me-downs from TWO big sisters, she just LOVES new dresses and I had to sew up the beautiful Simple Life Pattern Company Wendy. That sweet collar just screamed for some gold piping. I admit I am usually the queen of KAM snaps since I am sewing for four children – but I had to give this dress the honor of buttonholes and gorgeous vintage buttons.
I honestly don’t remember when or where I got this fabric. It is a very nice taffeta with vertical stretch. I had to slim out the skirt of the pattern to accommodate the extra fullness that the taffeta has. My daughter is right between a size 4 and 5 on the size chart. I made her a 4 since most of my children start to stretch up and slim down at this age and I wanted the bodice to fit her nicely.
Big or small, every little lady deserves to feel special. I’m so glad that with Simple Life Patterns, I can make them something that makes them shine throughout the holidays and beyond.
I’ve had the privilege of seeing some sneak peeks from the other amazing makers on the blog tour! Make sure you visit these incredible women and see what they are sewing!
Happy Sewing and Happy Holidays!
November 13 – Kainara Stitches – Ammon Lane
November 14 – Sew and Tell Project – Lace and Pine
November 15 – Sunflower Seams – SewSophieLynn
November 16 – Wonderfully Handmade – Idle Sunshine – I am Mami de Sofiona
November 17 – Pear Berry Lane – It’s Liesel
There are TWO ways to win in this giveaway!
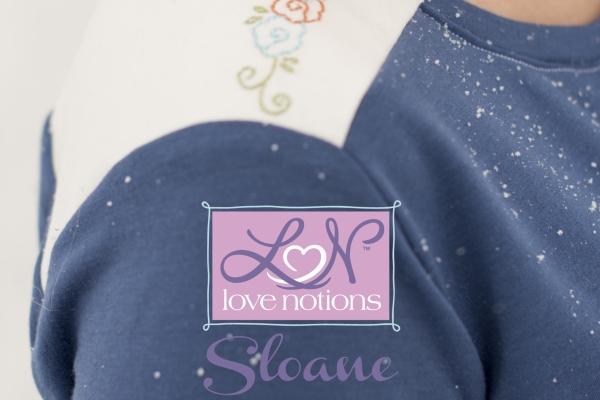
For the blog tour, I opted to make something that is just my fit and style these days. I live in the upper Upper Midwest (like almost to Canada, yo). I sewed up View A with the optional yoke. I added 3″ to length both to account for the usual 2″ I add for my 5’10” height and also because I like my tops to run a little long to accommodate all the chasing and bending I do all day as a “go-everywhere-but-home” homeschool mom.
I wanted to add a bit of subtle detail to my Sloane, so I decided to add some embroidery to the yoke. Originally I wanted to do a full Mexican-inspired embroidered back yoke but ran into some challenges midway through the project. I ultimately decided to just add some light embroidery using only a backstitch to the shoulder yoke. I’m really glad I opted to do this instead of my original design because whether I wear my hair up or down, my hard work can be seen. I actually used a good old fashioned tea towel transfer for my design.
I styled my Sloane with my favorite Mossimo high-rise skinny jeans from Target and my Merrell Moto Boots. I used fabric from my first order from Stylish Fabric. This is a Denim French terry with very nice drape for my main and some scrap cotton lycra in my stash for the yoke. I chose cotton lycra for the yoke (it’s not recommended for the body of the Sloane) because I wanted it to have some stability for embroidery. I interfaced the shoulder section of my yoke, did my embroidery, and then lined my yoke by cutting another yoke piece to cover up the back side of my embroidery.
I hope this project and other projects on the Sloane Blog Tour inspire you to join us in making 1 Sloane or a dozen! Make sure you check out all the other makers!
Monday: Sew Shelly Sew, The Wholesome Mama, Ruby Rue Creations
Tuesday: Third Shift Creations, Sew Like a Sloth, Four Seasons and a Roadtrip
Wednesday: Seamly Behaviour, My Heart Will Sew On, Ma Moose
Thursday: SewSophieLynn, Very Blissful Blog, Kainara stitches, Sprouting JubeJube
Friday: Sew and Tell Project, Sewing curves, Princesse et

Can you believe Halloween is just around the corner? It sneaks up on me every year. This year, I am headed to International Quilt Market in Houston (in 10 days!!!) so I want to be sure my kids have their costumes ready before I go so I can just enjoy the festivities when I get home.
If you have children, you have probably now seen the hit Disney movie “Moana” a few or a dozen times. I LOVE so much about the Moana movie so making my 3-year-old a Moana dress was super-fun for me.
I have a few rules about sewing costumes for children: