this is a page for
Category: Accessories
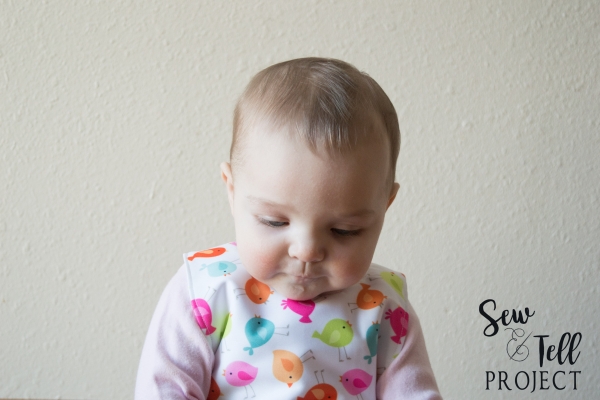
I’m back with another great baby pattern from Peek a Boo Pattern Shop! This week’s new release is the Houdini Bib. Miss M is almost 8 months old and in the last few weeks has really discovered her love of solids! However, her second love is trying to eat her bib while I’m trying to feed her. The Houdini Bib has solved my problem.
The Houdini Bib has two versions: a basic bib with just the strap around the neck, and the Houdini version which has straps that criss cross in the back and snap below the arms. It is also available in three sizes: baby, toddler, and preschooler. After I made these, an inch was added to the length of the Houdini straps to provide a bit more room for movement.
Peek-a-Boo Pattern Shop is one of our favorite sewing pattern and fabric shops and we talk about them a lot on this blog!
But did you know that PAB recently expanded to include digital designs for use with your Cricut or Silhouette cutting machines?
I have been requesting for quite some time that there be a homeschool themed cut file for those of us prepping to go back to school…..right at home. I’m entering my sixth year homeschooling my children and I have to confess that I get a little bummed when I see all the teacher-themed items filling up the Dollar Spot at Target and none of it is for me.
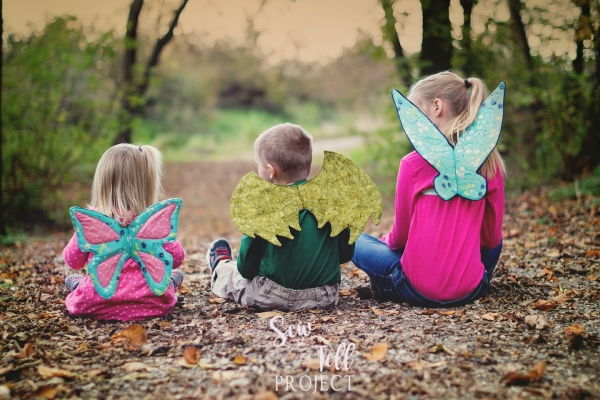
I tested the newly-released Wonderland Wings by Peek-a-Boo Pattern Shop. The Wonderland Wings pattern includes three unique wing shapes: butterfly, fairy, and dragon. Testers also used the shapes to make angel and bat wings! This is a very versatile pattern to be used for Halloween or everyday dress up. I finished each pair in about 2 hours from cut to finish. The wings are made with 2 layers of very stiff interfacing to give them a nice shape! I was intimidated at first to sew with two layers of Peltex 71F on my little machine, but the tutorial includes tips and suggestions to make it easier.
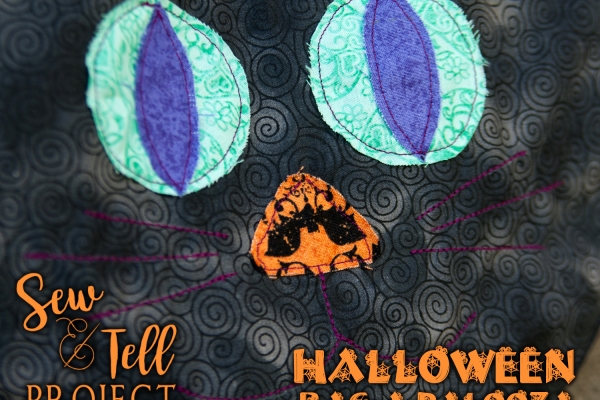
Halloween is just around the corner, and I’ve got a Kitty Cat Treat Bag for you today, with a super easy tutorial to make your own!
This bag can be made by a beginner, although it does involve sewing a strap and several curves. Don’t worry, you can do it! You’ll need about half a yard of your base fabric; that will be enough to cut your bag pieces, lining, and strap. You’ll also need some scraps to make the appliques for the front. I’ve made a spooky Halloween cat, but this shape easily lends itself to a Jack-o-Lantern or pumpkin, too! While you can just pin the applique pieces down, I highly recommend using some sort of double stick interfacing or tape to hold the pieces in place while you stitch. In addition, you’ll need pins, a sewing machine, thread (I used a contrasting color), about a half yard of lightweight interfacing, tailor’s chalk or a washaway marking pen, a flexible measureing tape, and two round templates (one with a diameter of 12-ish inches, and the other about 8 inches).
The Sew and Tell Project team is absolutely thrilled to have won Week 3 with Emily’s amazing Zorro ensemble and make it to the 4th and final round of Project Run & Play. We have loved connecting with the other contestants, challenging ourselves, and working to bring great new ideas and inspiration to our little corner of blog land. Make sure you visit Project Run & Play right now to vote! Voting closes on Thursday October 6th at 8 PM MST.
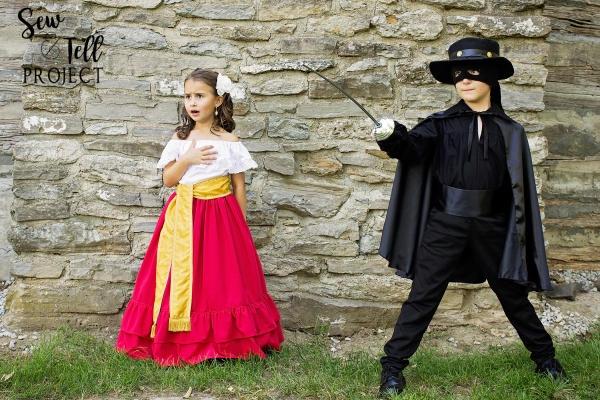
Hello and thanks for stopping by! It is hard to believe that it is already week 3 of Project Run & Play! This week’s challenge was to create a costume – which is perfect because Halloween is right around the corner. I’m delighted to share these Zorro and Victoria costumes with you. Please make sure you click over to Project Run & Play so you can vote!
Zorro is a favorite around here and we love the TV series – both the Disney one with Guy Williams from the 1950’s and this newer one from the 1990’s with Duncan Regehr. The costume for this lovely little senorita was modeled after the spunky Victoria in the newer series.
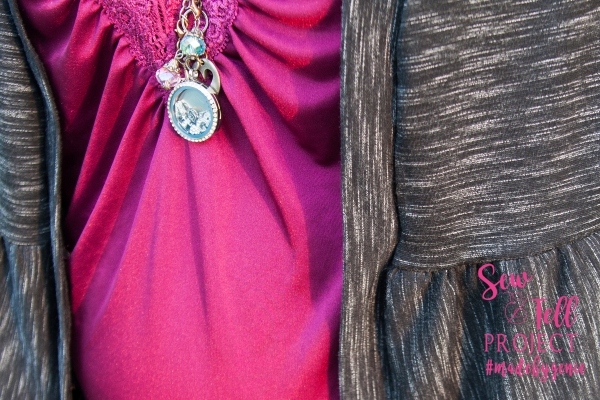
I was excited when I found out that autumn was the theme for the second week of competition in Project Run + Play. It’s my favorite time of year! I was able to mix some of my very favorite elements into a stylish and super fun outfit for my tween daughter. Tweens are so hard to sew for. They’re picky, for one, and have developed their own sense of style. In addition, this age category, somewhere in between a girl’s and a woman’s shape, is so underserved by pattern designers. Patterns don’t fit well and are often either too old or too young in style. I’ve become pretty adept at modifying patterns to fit better, and definitely at choosing patterns that will suit her for both size and sensitivity. Even though I sometimes have to use adult patterns, she’s still my baby, and she still loves the things her mama makes her.
I am very happy to share my first pattern test for Love Notions, the new Canyon Cardigan. This was such a fun group to test for, and I truly adore this pattern. I see many more of these in my future. I LIVE in cardigans in cooler weather, and there are so many style options to choose from!
The cardigan is available in sizes xs through xxxl. This awesome layering piece has options for 3/4 and long sleeves, and a sleeveless vest option. The bottom skirt can be an a-line, a fuller gathered version, or a super fun waterfall version. Be sure to check out the pattern listing, because the creative testers used so many types of fabric, and each one makes the cardigan look just a little different.
This is my middle daughter AKA Middle Miss. She is filled with spunk and whimsy and is probably my greatest enabler when it comes to sewing. When she was a toddler she would wander into my fabric cabinet and ask me to make her a “pwetty dwess.” She still LOVES to give me inspiration pictures and shop for fabric with me, but as I’ve started to have more children and more demands on my time, she doesn’t always get exactly what she wants when she wants it.

A handmade veil adds such a special touch to momentous occasions such weddings and first communions. In addition to creating a special memento of the day, making a veil can also be much more cost-effective while allowing the lucky lady to have exactly what she envisioned.
For this project, I created a wrist length veil for a petite bride who wanted to wear it more towards the back of her head, as opposed to on top. We started with a 29″ length of tulle to achieve the right length for her hairstyle and stature. Before actually making the real veil, I made up a quick veil, minus the comb, with a very visible rolled hem edge so she could see the exact cut of the tulle, for her to try on and play around with. When working with brides, especially from a distance, this added step can be well worth it. Tulle is relatively cheap so it is easy to play around with, but making the actual veil is a bit more time consuming. Keep in mind that a bulky wedding up-do can make a veil appear a lot shorter.