Kitty Cat Halloween Treat Bag
Halloween is just around the corner, and I’ve got a Kitty Cat Treat Bag for you today, with a super easy tutorial to make your own!

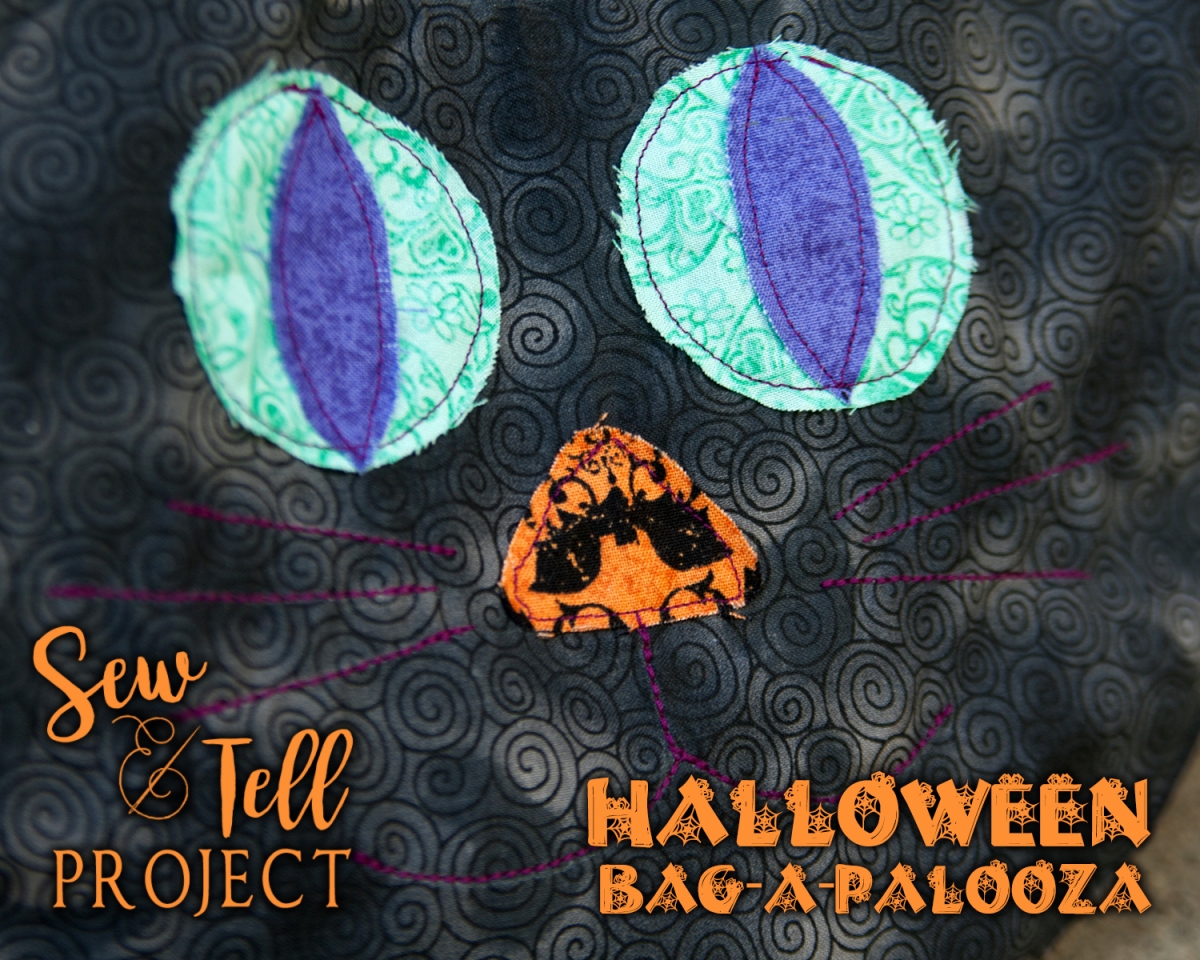
This bag can be made by a beginner, although it does involve sewing a strap and several curves. Don’t worry, you can do it! You’ll need about half a yard of your base fabric; that will be enough to cut your bag pieces, lining, and strap. You’ll also need some scraps to make the appliques for the front. I’ve made a spooky Halloween cat, but this shape easily lends itself to a Jack-o-Lantern or pumpkin, too! While you can just pin the applique pieces down, I highly recommend using some sort of double stick interfacing or tape to hold the pieces in place while you stitch. In addition, you’ll need pins, a sewing machine, thread (I used a contrasting color), about a half yard of lightweight interfacing, tailor’s chalk or a washaway marking pen, a flexible measureing tape, and two round templates (one with a diameter of 12-ish inches, and the other about 8 inches).

The first step will be cutting out your pieces. You’ll need 4 circles using your larger template (I used a serving plate for the larger template, and a salad plate for the smaller. Don’t tell my mom I used my china to cut fabric!). Use the smaller template to cut the top curve of the bag. I’m a big fan of “eyeballing it,” but the bottom of my curve is approximately 8 1/2 inches from the bottom of the bag. You’ll also need to cut 3 long strips. To determine the length of the two gusset strips, use a measuring tape to curve around the outside of your bag, from point to point. The width should be 3 inches. The handle for my bag was 17 x 3 inches. You’ll then need to cut interfacing in the exact same dimensions (I interfaced both the bag and lining with lightweight interfacing, but you could just interface the lining if you use a heavier interfacing). Finally, you’ll need to cut your scraps into the accent pieces: for my kitty, I cut 2 circles (diameter 2 inches each) with a pointy oval shape for the pupils. I cut a rounded triangle for the nose, and used the main bag piece as a guide to cut the ears with a slight curve (straight triangles would work just fine). For a pumpkin, you could just stitch curved lines on the main piece, and applique a leaf or curly stem, and a Jack-o-Lantern has so many fun face possibilities! I used a 3/8″ seam allowance for this project, but you can adjust that to whatever you’re comfortable with.
Fuse interfacing to wrong side of all four bag pieces, both gusset pieces, and the strap.

Place your applique pieces and either fuse or pin securely. Use your tailor’s chalk or marking pen to indicate where you want to stitch accents (here, a mouth and whiskers).

Carefully, top stitch all of your applique pieces down, and any accent stitching, too. I used the triple stitch meant for knits to do my accent lines to make it thicker.

I wanted to add a gusset to the bag to give it a little depth (the kiddos need room for TREATS, amiright?, but I wanted to taper it toward the top so I wouldn’t need to add a top piece and/or closure. I measured about a quarter down the length of the piece, folded it in half wrong sides together, and then marked a curve with the point at the very top of the fold, tapering down to the raw edge a quarter way down the piece. I marked it with chalk, and then cut the piece off.

Next, pin the gusset piece to one of the curved bag pieces, right sides together. I started in the middle and worked my way to the top. Stitch. Carefully add a second bag piece to the gusset, again pinning from the middle to the top, right sides together, and stitching. Repeat with the lining pieces.

Please forgive my stained ironing board cover; my cheap ironing board has rusted underneath and I can’t get the stains out. I’ve asked my husband for a new ironing board for Christmas. He thinks that’s a funny gift. 😉
Next, we’ll make the strap. Fold the strap in half lengthwise, press. Unfold, and press 1/2″ wrong sides together on each short end. Unfold, and then press 1/2″ along each long side. Unfold, and then fold in the pressed edge of the short ends. Fold the sides in over, and then fold in half. Be sure to tuck all raw edges in. Top stitch the strap about 1/8″ from the edge. I like this method because I despise turning tubes of fabric right side out, but you could fold the strap lengthwise, stitch the seam allowance along the two short sides and the long side, leaving an opening to turn the strap right side out. Be sure to top stitch for stability and also to close the opening.

You’ll end up with two bags (one main, one lining) and a strap. I have an extra because I changed my mind on part of the design. So…*waves hand* this is not the strap you’re looking for…

Sew your strap to the lining, right sides together. Make a couple of lines of stitching to be sure its held firmly in place.

Turn the main bag inside out, and place the lining inside it, so that the right sides of the fabric are together. Please note that you don’t see my strap here because I took these pictures before I remembered to attach the strap, but decided not to retake them. I hope it’s not too confusing! When you insert the lining into the bag, be sure that the strap isn’t in the way of the top, where you’ll be stitching. Carefully pin the lining to the bag, being careful to match up the gusset and to keep the strap out of the way. Sew the top curve, being sure to leave an opening to turn the bag right side out.

Reach in through your opening and pull the lining out first, and then turn the bag right side out. Push the lining down into the bag and press if necessary. Turn under the seam allowance of the opening you left to turn the bag, pin, and top stitch the entire top curve. Voila!

Finally, fill that bad boy up with treats!
I hope you’ve enjoyed my Kitty Cat Treat Bag, and also that you’ll share yours if you choose to create one! Be sure to check out the 9 other treat bag tutorials on the Halloween Bag-a-Palooza Tour.


Related Posts

Ramona Quilt Featuring Lady Bird Fabrics!
Hello quilting friends!
I’ve slowly been trying to get back into the swing…
Blessed Carlo Acutis Book Review
Hello, friends! I know it’s been a bit since I’ve shown…
Denise/DIY Crush | 6th Oct 16
Gosh, how cute is this?!?! Awesome design, I just love cats and you made a stunningly cute bag with it!
MadebyGenie | 7th Oct 16
Thanks! The kids and I love cats, too. 🙂
Shelly Morgan | 11th Oct 16
I love this one! I really like how you made the bag the shape of a cat! Awesome. 🙂
10 DIY Halloween Trick or Treat Bag Tutorials - Halloween Bag-A-Palooza Roundup - | 3rd Jan 18
[…] DIY Cat Halloween Trick or Treat Bag Tutorial || Coral + Co. […]
Halloween Bag-a-Palooza Day 4 with Pear Berry Lane and Sew and Tell Project - | 11th Jan 18
[…] also love this spooky Kitty Cat Halloween Treat Bag made by Eleri from the Sew and Tell Project. This would be a super fun bag for a little […]
15 DIY Trick-Or-Treat And Loot Bags - DIYCraftsGuru | 5th Apr 21
[…] The Sew and Tell Project […]